
Features
Metal Roof Installation Guide
A step-by-step guide to installing a metal roof on your home.
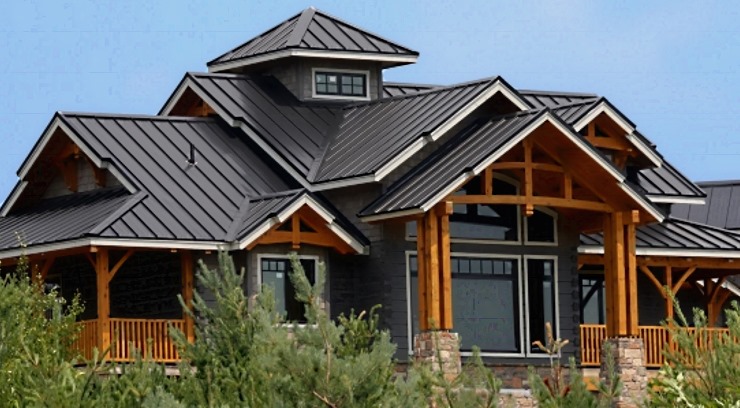
Embraced by homeowners for its transformative aesthetic and renowned durability, metal roofing installation has experienced a recent surge in popularity.
The robust nature of metal roofs allows them to withstand challenging weather conditions, enhancing both the resilience and the visual appeal of a home.
However, despite their straightforward design, successful metal roof installation requires a blend of skill and meticulous planning to ensure safety and durability.
Metal roofing installation steps
Here is a step-by-step guide to installing a metal roof on your home.
What are the steps to installing a metal roof?
1. Measure your roof
2. Remove or install a metal roof over an existing roof
3. Fix any roof damage
4. Place a moisture barrier
5. Install drip edges and closure strips
6. Install metal roofing panels
7. Add ridge cap
Instructions
1. Measure your roof
Begin by taking the measurements of your roof in order to determine the amount of roofing material that will be required.
Measure the length, width, and rise of a section, where the rise represents the vertical distance from the lowest to the highest point on the roof.
Use the rise number to calculate the roof slope, where slope equals rise divided by run. The slope factor is found by squaring the rise, adding it to the square of the run, taking the square root, and dividing by the run.
Multiply the slope factor by the area measurement to obtain the total square footage needed for coverage. Repeat this process for each roof section, ensuring to include an extra 10% length for waste.
2. Remove or install a metal roof over an existing roof
Most building codes limit the number of roofing layers to two. When installing a metal roof over an existing one, ensure compliance by verifying the allowed layers.
Consult with a building inspector for confirmation, considering that building codes may vary from one region to the next.
If you opt for a roof replacement, start by tearing off the existing roof. Plan wisely, as you will need a day or two of clear weather to get the job done.
3. Fix any roof damage
Once the roof is removed, inspect the frame, sheathing, insulation, and ventilation. Identify and fix any uncovered roof damage to ensure a robust and well-maintained structure.
RELATED: 11 Types of Roofing Materials
4. Place a moisture barrier
Before proceeding with your metal roofing installation, you will need to lay down a moisture barrier or insulation layer. Roofing felt paper serves this purpose effectively—simply secure it in place with staples or nails.
5. Install drip edges and closure strips
Start by installing drip edges along the eaves and rake of the roof. Secure them with 1-¼-inch galvanized roofing nails, spaced approximately 16 inches apart.
Ensure a 1/4 to 1/2 inch overlap for multiple runs, keeping nails away from lapped joints. Pay attention to gutters, allowing the drip flashing to overhang by 1/2 inch.
Apply sealant tape, then peel back the closure strip’s backer paper, placing it on top without stretching it out.
6. Install metal roofing panels
Begin metal roofing installation by overlapping the edging by 1/2 to 3/4 inch, ensuring a square alignment with the roofline.
Follow manufacturer guidelines for screw placement, particularly in hurricane-prone areas with additional codes.
RELATED: How to Choose the Best Roofing for Your Home
Start at the eaves, working upward, securing screws without overtightening.
Apply silicone sealant under the short edge of each next panel for a watertight seal. Continue adding and cutting panels as needed using tin snips or a circular saw.
7. Add ridge cap
After placing the panels, install ridge caps. Choose vented, or solid closure strips based on ventilation needs.
Mark ridge cap placement with a chalk line, apply sealant tape, and ensure a snug fit for closure strips. Add another strip of sealant tape on top.
Follow the manufacturer instructions for installing the ridge cap, using screws and overlapping pieces by about 6 inches.
Tips & warning
a.) Install a metal roofing system that has hidden gutter channels, since it will provide better drainage for your home while making it more visually appealing.
b.) Make your personal safety a top priority. Wear protective rubber-coated gloves while working with metal roofing and flashings.
c) After completing the metal roofing installation, ensure to sweep away any shavings or metal filings present on the roof. Neglecting this step may lead to the formation of rust spots, which accumulate on the roofing surface.


The 10 Most Read Construction Stories of 2023
The ten biggest construction stories of 2023 that you shouldn't miss.


Road Curve Design and Construction
Everything you need to know about road curves.

The ABCs of Drainage Construction
Everything you need to know about construction of drains.